Tuesday, November 10, 2020

Create Legacy Custom Exception Class

 Most of the analyzing tools are asking to create Custom Exception class than throwing Exception. So below is that legacy code snippet which create extending java Exception class


public class YourCustomException extends Exception {

    public YourCustomException() {

        super();

    }

    public YourCustomException(final String message) {

        super(message);

    }

    public YourCustomException(final String message, final Throwable cause) {

        super(message, cause);

    }

    public YourCustomException(final Throwable cause) {

        super(cause);

    }

}

%3CmxGraphModel%3E%3Croot%3E%3CmxCell%20id%3D%220%22%2F%3E%3CmxCell%20id%3D%221%22%20parent%3D%220%22%2F%3E%3CmxCell%20id%3D%222%22%20value%3D%22RuleEngine%22%20style%3D%22shape%3DumlLifeline%3Bperimeter%3DlifelinePerimeter%3Bcontainer%3D1%3Bcollapsible%3D0%3BrecursiveResize%3D0%3Brounded%3D0%3Bshadow%3D0%3BstrokeWidth%3D1%3B%22%20vertex%3D%221%22%20parent%3D%221%22%3E%3CmxGeometry%20x%3D%22120%22%20y%3D%2280%22%20width%3D%22100%22%20height%3D%221330%22%20as%3D%22geometry%22%2F%3E%3C%2FmxCell%3E%3CmxCell%20id%3D%223%22%20value%3D%22%22%20style%3D%22points%3D%5B%5D%3Bperimeter%3DorthogonalPerimeter%3Brounded%3D0%3Bshadow%3D0%3BstrokeWidth%3D1%3B%22%20vertex%3D%221%22%20parent%3D%222%22%3E%3CmxGeometry%20x%3D%2245%22%20y%3D%2270%22%20width%3D%2210%22%20height%3D%221260%22%20as%3D%22geometry%22%2F%3E%3C%2FmxCell%3E%3CmxCell%20id%3D%224%22%20value%3D%22main%22%20style%3D%22verticalAlign%3Dbottom%3BstartArrow%3Doval%3BendArrow%3Dblock%3BstartSize%3D8%3Bshadow%3D0%3BstrokeWidth%3D1%3B%22%20edge%3D%221%22%20parent%3D%222%22%20target%3D%223%22%3E%3CmxGeometry%20relative%3D%221%22%20as%3D%22geometry%22%3E%3CmxPoint%20x%3D%22-15%22%20y%3D%2270%22%20as%3D%22sourcePoint%22%2F%3E%3C%2FmxGeometry%3E%3C%2FmxCell%3E%3CmxCell%20id%3D%225%22%20value%3D%22%22%20style%3D%22points%3D%5B%5D%3Bperimeter%3DorthogonalPerimeter%3Brounded%3D0%3Bshadow%3D0%3BstrokeWidth%3D1%3B%22%20vertex%3D%221%22%20parent%3D%222%22%3E%3CmxGeometry%20x%3D%2250%22%20y%3D%22120%22%20width%3D%2210%22%20height%3D%2230%22%20as%3D%22geometry%22%2F%3E%3C%2FmxCell%3E%3C%2Froot%3E%3C%2FmxGraphModel%3E

Create Sonar Plugin - SonarQube and Sonar Scanner

 There are various ways to create a Sonar plugin(SonarQube Plugin). In this series of article I am going to explain the development of Sonar Plugin using Java.

Before going forward, let's look  at what is a Sonar ? What is Sonar Plugin and what it does ?

What is Sonar or SonarQube ?

SonarQube (formerly Sonar) is an open-source platform developed by SonarSource for continuous inspection of code quality to perform automatic reviews with static analysis of code to detect bugs, code smells, and security vulnerabilities on 20+ programming languages. SonarQube offers reports on duplicated code, coding standards, unit tests, code coverage, code complexity, comments, bugs, and security vulnerabilities.

https://en.wikipedia.org/wiki/SonarQube

https://www.sonarqube.org/

You can see lots of new terms like bugs, code smells ...etc. Do not worry. You do not need to know all these things in deep. But just have an idea. It will make your life easy and you will be easily understand what you want to do. :)

By the time you will familiar with SonarQube, you will realize that SonarQube is a Dashboard.

Below is the sample dashboard with a one project "MyProject" set up locally.

http://localhost:9000/projects


Great If you understand that, you are in good shape.

So if this is the Dashboard, then how the data comes to this dashboard ?

If you asked yourself ? you are Brilliant.

Yes, we need to push data to dashboard (SonarQube)

That's done using Sonar Scanner or Sonar CLI.

Sonar has lot's of tools. But basically these two types - you need to understand as a basic step to create Sonar Plugin.

Let's look at Scanner


Sonar Scanner

SonarScanner is a separate client type application that in connection with the SonarQube server will run project analysis and then send the results to the SonarQube server to process it. SonarScanner can handle most programming languages supported by SonarQube

Below is the link , how you config and run the Sonar Scanner

https://docs.sonarqube.org/latest/analysis/scan/sonarscanner/


So I believe, you have some idea about SonarQube (DashBoard) and SonarScanner ( Analysis tool)

Why  I say Analysis tool for Sonar Scanner is , Actual Analysis happens when you run the scanner.


So In simple, When you want to do and some analysis on your project source code 

  1. Run the anaysis invoking sonar-scanner
  2. sonar-scanner will generate the report and upload to SonarQube - (Dashboard)


This is the simplest explanation.

Now you have some idea about SonarQube and SonarScanner.

Then let's see how the plugin actually works.

How Sonar Plugin works

All SonarQube plugins are installed or reside inside the "Plugins" directory inside SonarQube.

  • Below is a sample path where "SonarQube" version7.1 is installed in the "Software" directory.
  • C:\Software\sonarqube-7.1\extensions\plugins
As i told you above, Next you need to invoke Sonar Scanner via command line.
  • type "sonar-scanner" and enter
  • your scan will run and report will be upload to SonarQube


At the end, you can see the log where link to SonarQube with your Project. In here i have done a scan on a project call "MyProject". The sample log will be as follows


INFO: CPD calculation finished

INFO: Analysis report generated in 186ms, dir size=27 KB

INFO: Analysis reports compressed in 29ms, zip size=9 KB

INFO: Analysis report uploaded in 165ms

INFO: ANALYSIS SUCCESSFUL, you can browse http://localhost:9000/dashboard/index/MyProject

INFO: Note that you will be able to access the updated dashboard once the server has processed the submitted analysis report

INFO: More about the report processing at http://localhost:9000/api/ce/task?id=AXWtaKEPKlLJW_efck3G

INFO: Task total time: 11.976 s

INFO: ------------------------------------------------------------------------

INFO: EXECUTION SUCCESS

INFO: ------------------------------------------------------------------------

INFO: Total time: 16.182s

INFO: Final Memory: 16M/240M

INFO: ------------------------------------------------------------------------


Wednesday, November 4, 2020

JIRA Basic - Create Users

 You can create users manually or invite them adding email. 

Here we going to show the steps to add a user manually. you need to log in as an Administrator.

1. Go to "Jira Administration" --> User  Management


you will get a comprehensive window like below where you can filter, Invite  users. To add manually click "Create"  in top right corner.


Create User manually


2. fill details in the "Create New User" panel and click "Create User"


Create New User


JIRA Basic - Create Sprint

 To create a sprint you probably need a project and some items in the backlog.

  1. To create project refer https://cgenit.blogspot.com/2020/11/jira-basic-create-project.html
  2. To create Backlog items https://cgenit.blogspot.com/2020/11/jira-basic-create-backlog-items.html

Let's create a Sprint.

Select the project you need and go to backlog. In the initial stage this would like this where only few items in the backlog.


1. Go to you project. Select Backlog. Click "Create Sprint"


you can see brand new sprint has been created with name "TDS1 Sprint1".

  • "TDS1" is the key of the project. 
  • "Sprint1" default name for First Sprint.


2. Set goals for the Sprint.

  • Click "Elispe" in top right corner to add goals


Note: If you do not want, you can delete your Sprint option also available.

  • "test goal 1" added. if you need you can edit this.


2. Add issues to Sprint.

  • Click "Create Issue" to add a new Issue.
  • else you can drag and drop item from backlog items in the bottom.
Before drag and drop Issue from Backlog or adding new issues by clicking "Create issue"


After drag and drop items. Here i have dragged "task 1" from backlog

Drag "task 1" from backlog


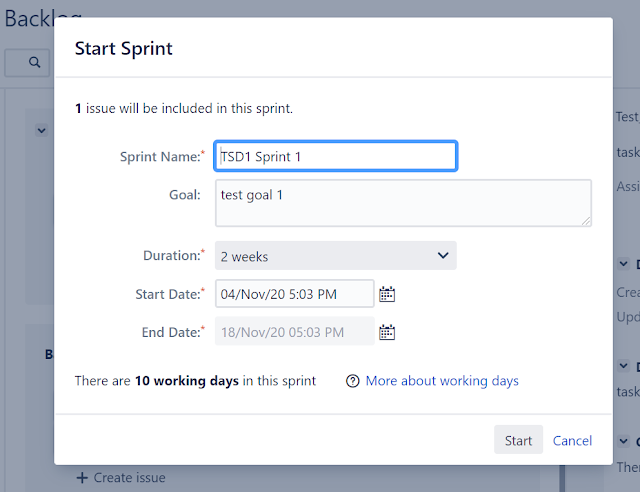
3. Now you have items. Click "Start Sprint" to start the Sprint.
    Here you can set values again for the 
  • Sprint Name
  • Goal
  • Duration
  • Start date and end date


Start Sprint -  Set values


4. Once you start, you can see your Sprint under "Active Sprints"

Active Sprints


5. "TSD1 Sprint1" is the active sprint and as I have added only one task with name "task 1"
When I create the project, I had the basic flow with stages
  • ToDo
  • In Progress
  • Done
As we are still in start point, our "task 1" is in "TO DO" stage.

JIRA Basic - Create Backlog items

 Prior to create backlog items, you need to have a project. To create a project , please refer https://cgenit.blogspot.com/2020/11/jira-basic-create-project.html

Select the project you need. Then you can see the "Backlog" in right pane. I am selecting the "Test_ScrumSoftDevPrj1" - Scrum Software development type project.


1. Click "Create" in the top ribbon. You will basically get a window like below.


Here you will have few Issue Types

  • Task
  • Story
  • Bug
  • Epic
  • IT Help
  • Service Request
  • Service Request With Approvals

Don't worry , if you do not have all the items. Most probably you will have Task, Story, Bug, Epic.


Issue Types


2. Start adding issues of each types

2.1 Add Task

Select "Task" from "Issue Type" and fill details and Click "Create" or "Create another"

same way you can create Story, Epic

Once you create Issues, they will be shown in the Backlog.

It's better to create an Epic cause when you create Bug, Story .. then you can assign it relevant Epic.

Here I have 

create Task1, Epic1, Story1,bug1. 

Assign story1 and bug1 under epic1


Now you have items, then as next step you can create a sprint.

you would see this as message in newer JIRA versions.


JIRA Basic - Create Project - Scrum Software development

Create Project

1.       Project à Create Project


You will have various types of Projects

  • ·       Software
  • ·       Service Desk
  • ·       Business


Under Software

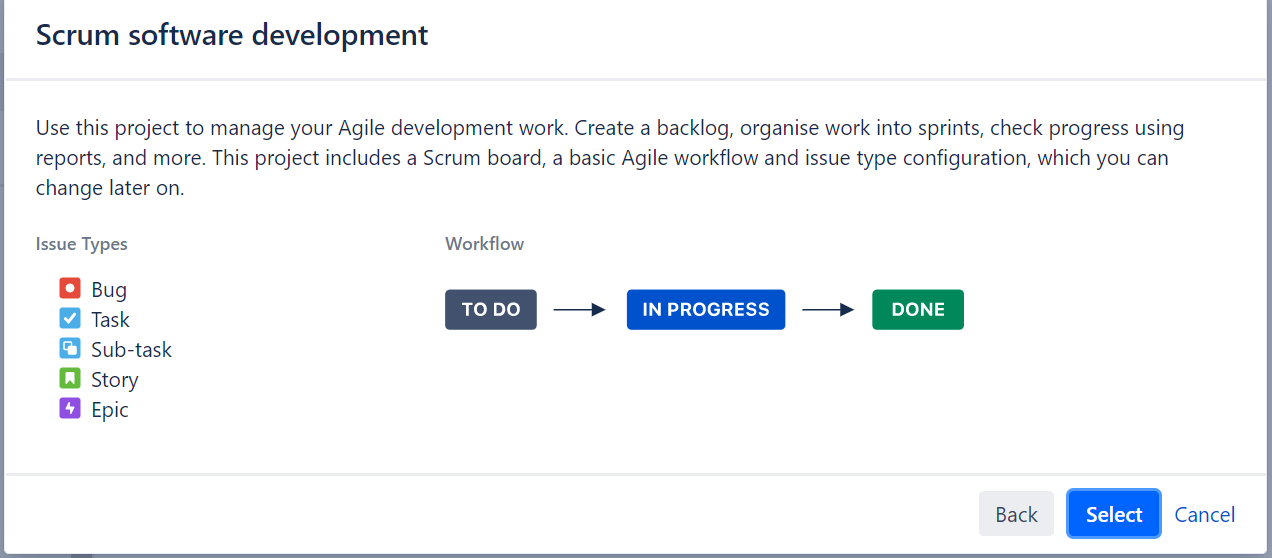
  • Scrum Software development
  • Kanban Software development
  • Basic Software development


Let's create a "Scrum Software development"

Scrum Software development

Select "Scrum Software development" and click "Next"


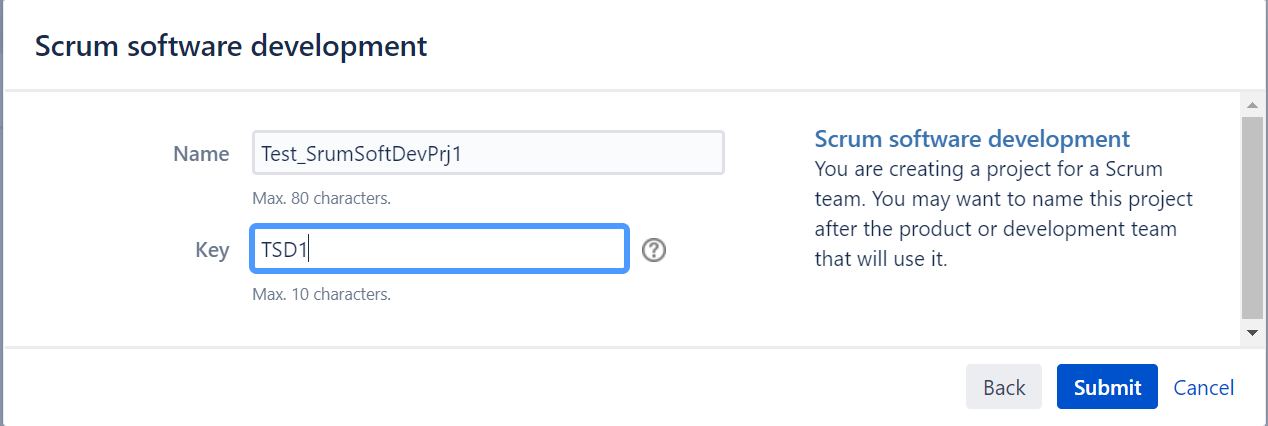
Go through the navigation


Give a name for Project and a Key.


Click "Submit"

You will get initial Dishoard like below.


Sunday, November 1, 2020

Clearing Space in your Machine

 Recently I have seen my  hard drive space has been reduced. When i looked at, just saw "User/{you username} takes around 50GB.

I am searching how to reduce this and take some space. Below are few steps I did in my Window 10 machine.


Clear Temp Folder and Download Folder

C:\Users\{username}\AppData\Local\Temp

C:\Users\{username}\Downloads