Monday, November 29, 2021

Ninja - React Basic 11 - Reuse Components

Let's reuse this componet we use. We already use to show the values in the 'blogs'

Now we need to show the values filter by author='mario'

let's see how are going to use this.


1. let's create a new div tag below.

<BlogList blogs={blogs} title="Mario's Blogs"/>

2. we can use filter

<BlogList blogs={blogs.filter()} title="Mario's Blogs"/>

3. Then, this filter method will call a call back function for each otem in  the array

<BlogList blogs={blogs.filter(  ()= {} )} title="Mario's Blogs"/>


a.) if true keeps in the array

b.) if false, filters outof the array

c.) and return new array with only filtered true values


4. Then passing that 'data' as a  prop.


if we show the original data


const [blogs, setBlogs] = useState([

        { title: 'My new website', body: 'lorem ipsum...', author: 'mario', id: 1 },

        { title: 'Welcome party!', body: 'lorem ipsum...', author: 'yoshi', id: 2 },

        { title: 'Web dev top tips', body: 'lorem ipsum...', author: 'mario', id: 3 }

    ]);

5. take 'blog' as arguemnt for filter

<BlogList blogs={blogs.filter(  (blogs)= {} )} title="Mario's Blogs"/>

6. check author=mario

<BlogList blogs={blogs.filter( (blog) => blog.author==='mario' )} title="Mario's Blogs"/>

Ninja - React Basic 10 - Props

Let's look at scenario where we have blogs in each page as we did it in Home page. Then we need to repeat the code block in every page.  

How to do it in a more better way.

we can make that bit of template as resusable component. eg: blog list component


{blogs.map(((blog) => (

                <div className='blog-preview' key={blog.id}>

                    <h2>{blog.title}</h2>

                    <p>Written by {blog.author}</p>

                </div>

            )))}


So if need to use that part in a category, tag or in any place we can just drop our component 'blog-list'.  We don't  need to repeat this total boiler plate code.


We use 'props'

with this template or component will be same, but data will be different. This helps to reuse.


1. create blog list component to hold the logic

2. create file 'BlogList.js' and create component BlogList


const BlogList = () => {

    return ();

}


export default BlogList;


3. Inside return copy paste the template we a re going to reuse. 

4. Before that let's  create a div , className=blog-list


const BlogList = () => {

    return (

        <div className='blog-list'>

            {blogs.map(((blog) => (

                <div className='blog-preview' key={blog.id}>

                    <h2>{blog.title}</h2>

                    <p>Written by {blog.author}</p>

                </div>

            )))}

        </div>

    );

}


5. Now inside home.js , we can simply use <BlogList />


return (

        <div className="home">

            <BlogList />

        </div>

    );


6. Now you get an error

'blogs' is not defined  no-undef


7. Because blogs data is not defined inside BlogList, we cannot use data defined inside another component.

8. How to solve ? There are few solutions.

8.1 Define data inside BlogList instead of Home

8.2 Use Props -> we pass this data from Home component into the BlogList component. 

9. We use second option props for three reasons


a. make BlogList component more resusable

b. We can still use data in the Home component, if needed inside Home component

c. Most important -> How to use props


10. Props is a way to pass data from a parent component to child component

11. Here Home is the parent and BlogList is the Child component

12. we are passing 'blogs' data into BlogList component

13. To do that, we create a property inside the <BlogList /> tag. You can call any name. Let's call 'blogs' as it's what we are passing.

<BlogList blogs= />

14. So this going to be a dynamic value, So curly braces.

<BlogList blogs={} />

15. value is 'blogs'. defined in top of the Home component.  

<div className="home">

            <BlogList blogs={blogs} />

 </div>

16. Now this is a prop. Now you will see an error

src\component\BlogList.js

  Line 4:14:  'blogs' is not defined  no-undef


17. This is cause of the next step, we are now going to use in BlogList. give tis as a parameter to BlogList


const BlogList = (blogs) => {

    return (

        <div className='blog-list'>

            {blogs.map(((blog) => (

                <div className='blog-preview' key={blog.id}>

                    <h2>{blog.title}</h2>

                    <p>Written by {blog.author}</p>

                </div>

            )))}

        </div>

    );

}


18. Now your error will disapear

19. Now we have another error


TypeError: blogs.map is not a function


20. getting an error


Failed to compile

./src/component/BlogList.js

SyntaxError: C:\Project\Project\Training\React\NetNinja\dojo-blog\src\component\BlogList.js: Identifier 'blogs' has already been declared. (1:18)


This is cause, i used 'blogs' instead of 'props' in BlogList(props)


const BlogList = (blogs) => {

    const blogs = this.props.blogs;

    return (

        <div className='blog-list'>

            {blogs.map(((blog) => (

                <div className='blog-preview' key={blog.id}>

                    <h2>{blog.title}</h2>

                    <p>Written by {blog.author}</p>

                </div>

            )))}

        </div>

    );

}


--------------------------------------

corrected code is

----------------------


const BlogList = (props) => {

    const blogs = this.props.blogs;

    return (

        <div className='blog-list'>

            {blogs.map(((blog) => (

                <div className='blog-preview' key={blog.id}>

                    <h2>{blog.title}</h2>

                    <p>Written by {blog.author}</p>

                </div>

            )))}

        </div>

    );

}


export default BlogList;


--------------------


21. But still get an error

TypeError: Cannot read properties of undefined (reading 'props')

BlogList

C:/Project/....../src/component/BlogList.js:2

  1 | const BlogList = (props) => {

> 2 |     const blogs = this.props.blogs;

  3 |     return (

  4 |         <div className='blog-list'>

  5 |             {blogs.map(((blog) => (


22. Reason for using 'this' keyword when accessing props 

const blogs = this.props.blogs;

23. remove 'this' and you will see page in the browser

24. Let's console out props and blogs

console.log(props,blogs);


25. you can see all the properties and blogs list.


Now we can pass multiple props

---------------------------

26. eg:title , it can be dynamic value, but here we just pass a string in Home.js

27. <BlogList blogs={blogs} title="All Blogs"/>  in Home.js

28. Now we can access this from BlogList and let's use in h2 tag and out put.


-----------------------------------------------------

const BlogList = (props) => {

    const blogs = props.blogs;

    const title = props.title;

    return (

        <div className='blog-list'>

            <h2>{title}</h2>

            {blogs.map(((blog) => (

                <div className='blog-preview' key={blog.id}>

                    <h2>{blog.title}</h2>

                    <p>Written by {blog.author}</p>

                </div>

            )))}

        </div>

    );

}

--------------------------------------------------


Further we can destructure 'props'

then we don't need const variables and can use straight away.

Code will looks like

---------------------------------------------------

const BlogList = ({blogs, title}) => {

    // const blogs = props.blogs;

    // const title = props.title;

    return (

        <div className='blog-list'>

            <h2>{title}</h2>

            {blogs.map(((blog) => (

                <div className='blog-preview' key={blog.id}>

                    <h2>{blog.title}</h2>

                    <p>Written by {blog.author}</p>

                </div>

            )))}

        </div>

    );

}

----------------------------------------------------


you can play with code and check what happens after changing name of the props and variables.

Yu can see , it will  still work without any issues.

const BlogList = (props1=> {
    const blogs = props1.blogs;
    const title = props1.title;
    return (
        <div className='blog-list'>
            <h2>{title}</h2>
            {blogs.map(((blog=> (
                <div className='blog-preview' key={blog.id}>
                    <h2>{blog.title}</h2>
                    <p>Written by {blog.author}</p>
                </div>
            )))}
        </div>
    );
}

Ninja - React Basic 9 - Output Lists

1. create const to hold array of items using useState


steps

1. const [blogs, setBlogs] = useState();

2. Then add array inaside useState();

3. how to create array [{item1},{item2},{item3}]


const [blogs, setBlogs] = useState([

        { title: 'My new website', body: 'lorem ipsum...', author: 'mario', id: 1 },

        { title: 'Welcome party!', body: 'lorem ipsum...', author: 'yoshi', id: 2 },

        { title: 'Web dev top tips', body: 'lorem ipsum...', author: 'mario', id: 3 }

    ]);

Now we have list, array of items

Next how we going to show them in the template

Let's use the same return tag with Home div tag


 return (

        <div className="home">      

        </div>

    );

Inside here using mustache {} , let's try to print


1. use blogs property -> {blogs}

2. then use map method on this --> {blogs.map()}

3. map method will call , call back function for each item , where by each item around we need to return a jsx template. That's gone a go inside parathesis.

4. {blogs.map((() => ()))}

if we format

{blogs.map((() => (


           )))}


5. for each iteration , we get the access to each item. Let's call it 'blog'

6. So we give it as a input parameter

7. 

{blogs.map(((blog) => (


           )))}


8. On this item, 'blog' as we iterate we get the access to its properties. eg: title, body ...

9. what we plan to put for each item will be next

10. div with classname =  blog-preview . for each item in home page.


 return (

        <div className="home">

            {blogs.map(((blog) => (

                <div className='blog-preview'></div>

            )))}

        </div>

    );

11. When we iterate through items, each root element must have 'key' property. Reat use this to keep track in dom

12. So if we remove or add, data change -  react can keep track of those items


<div className='blog-preview' key={}></div>


13. This must be unique

14. our id will be blog.id


<div className='blog-preview' key={blog.id}></div>


15. Inside this, inside div tag you can do what you need per each item

16. let's output tile in h2 tag and , below that aouthor in para tag


<div className='blog-preview' key={blog.id}>

                    <h2>{blog.title}</h2>

                    <p>Written by {blog.author}</p>

                </div>

Now you should see the output as

---------------------------------


My new website

Written by mario


Welcome party!

Written by yoshi


Web dev top tips

Written by mario


17. For make it pretty, you can add css for preview part inside index.css


Ninja - React Basic 8 - Using State


Here we look at data or variable state change over event or  some action.
Let's create a simple variable and see what's happening in react template.

1. let's declare a variable 'name' 
2. create <p> tag and output name  --> {name}


let name = 'mario';

<p>{name}</p>

Scenario 2: Click button, change the name
1. we have function for handleClick and set name='Alex'

let's see whether name change in the template <p>{name}</p>

Note : Name value does not change in the template. It's  still 'mario'

But if you use console.log , you can see the name is changed to 'Alex'

So why not in the template ?

Reason :  The variable we created is not Reactive.
React does not watch the changes of the variable.
When value changes, template does not "ReRender"

To do this, we use a 'Hook' --> UseState
you can identify a hook with name "Use"

In order to use, we need to import
use curly braces to Destructure use state hook from React library

So let's remove what we have written inside handleClick and rewrite using useState

import {useState } from 'react';

but as we have other imports it will looks like this

import React, { Component, useState } from 'react';

Then look at step by step use of state

1. comment out variable  
// let name = 'mario';
2. Instead we gone use a Reactive value using 'useState'
3. How we do. useState is a function , so  --> useState()
4. Then we use useState with a initial value --> useState('mario')
5. Then we need to store it. Else it will be just an invoke.
6. how to do that ? we use 'const' but there is a return from the useState function. SO we use array [] to destructuring to grab two values return by hook
7. const []  = useState('mario')
8. Two return values, so first value will be name 'mario' we set. we can give an any name for it, as here it's a name of a person we can call 'name'. second value will be function, 'which we can use to chnage the value'. Normally in convention, prefix 'set' and 'name of the variable'. Here 'setName'
9. Now we can use the state to get the value for the Template, or render value for template using state
10. So at beginning 'mario' and once click , change the value for 'Alex'
11. So we need to call the function to change the value of useSet, setName
12. We call 'setName' inside our function 'handleClick'. When we call, we can pass the new value

const [name, setName] = useState('mario');

const handleClick = () => {
   setName('Alex');
}

13. This value is reactive. If the value of 'name' changes it will be change inside the template also.
14. So when we call the function, react will  Rerender the template. When it ReRender, template will have new value as it's been updated.
15. 

Note Error:
---------------
Compiled with warnings.
Failed to compile.

src\component\Home.js
  Line 4:25:  React Hook "useState" cannot be called at the top level. React Hooks must be called in a React function component or a custom React Hook function  react-hooks/rules-of-hooks

Search for the keywords to learn more about each error.

My Import
---------

import React, { Component, useState } from 'react';

Correct one
--------
import React, { Component, useState } from 'react';


Reason here 
1. i was calling setState outside function
2. Using a class, instead of function

Final code
---------------

import { useState } from 'react';

const Home = () =>{
    const [name, setName] = useState('mario');
    const [age, setAge] = useState(25);

    const handleClick = () => {
        setName('Alex');
        setAge(30);
    }

    return (
        <div className="home">
            <h2>HomePage</h2>
            <p>{ name } is { age } years old</p>
            <button onClick={handleClick} >Click Me</button>
        </div>
    );

}


Note: Here, Home has set on variable , holding function.
Inside , we define variables, 

export default Home;


Thursday, November 25, 2021

Ninja - React Basic 4 - Click event

  1. Create Button
  2. Create function for click event - handleClick
  3. Link the button with click function


Let's add a button below <h2> Home Page <h2> , inside Home.js

code will below

<button>Click Me</button>


Now write click function


const handleClick = () => {

    console.log('Hello World Click');

}


Here 'const' variable for function

handleClick =  name of function

then assign the function


() => {

    console.log('Hello World Click');

}


Note , we don't have parameters, that's why () before =>


3. Link the function with Click button, event 'onClick'


Note: if we pass function call instead of reference, function will call and write "Hello World Click" inside console

<button onClick={handleClick()}>Click Me</button>

you can check taking console of the browser.

It will be called when page loaded. When you click, click function won't  be called also.

This is not what we need, we need to invoke 'handleClick' function when you click the button.

How to pass reference ? --> just pass the name of the function


<button onClick={handleClick}>Click Me</button>


Note: if you pass function name with (), it's calling function

To call at event - pass only name - without () -  reference of the function


final code looks like


------------------------------------------------------------------


import React, { Component } from 'react';


const handleClick = () => {

    console.log('Hello World Click');

}


class Home extends Component {

    render() {

        return (

            <div className='home'>

                <h2>Home Page</h2>

                <button onClick={handleClick}>Click Me</button>

            </div>

        );

    }

}


---------------------------------------------------------------


Create function with parameters


1. Create a new button 

2. Create new function with parameters -> handleClickWithPara

3. Link function with button click event


const handleClickWithPara = (name) => {

    console.log('Hello '+ name)

}


function will take parameter 'name' and log in console after concatenate


Tricky part is in the calling parameter. If you  can remember top,

we can call the function with giving value itself inside call


<button onClick={handleClickWithPara('mario')}>Click With Para</button>


This will print "Hello mario" inside Console and if you click the new button "Click With Para" , nothing will happen as usual, explain in above


Now how to call this.

we need to  make an anonymous function inside dynamic call , - inside mustache


1. we need  to wrap "handleClickWithPara('mario')"  inside an anonymous function

2. So let's remove above from onClick={handleClickWithPara('mario')} and let's add arrow function as basic step

3. let's add arrow function as basic step

4. () => {}

5. after adding it will look like

6. onClick={() => {}}

7. Nothing will happen in browser or console, as nothing inside

8. IN simple, "() => {}" is function fire when user click "Click With Para" button

9. To understand bit, let's add log statement. () => {console.log('Hello')}

10. onClick={() => {console.log('Hello')}}

11. This will print 'Hello' inside console , when you click new button "Click With Para"

12. This is an anonymous function, where you don't keep in const. it will fire when the click event raised, as we have linked to "onClick" event

13. Now we can add our handleClickWithPara call inside, replacing console.log statement

14. {() => {handleClickWithPara('mario')}}


<button onClick={() => {handleClickWithPara('mario')}}>Click With Para</button>


Now you can see "Hello mario" print when new button "Click With Para" clicks


15. We don't need inner curly braces, as we have only one line. So let's remove.

 <button onClick={() => handleClickWithPara('mario')}>Click With Para</button>

16. But still we need outer curly braces as its for dynamic call


To learn more

first parameter will be the event object which will  be assign automatically as a parameter.

we can check this adding 'e' for our function without parameter -> handleClick


1. we can add 'e' as parameter  and print 'e' inside console log


const handleClick = (e) => {

    console.log('Hello World Click',e);

}


2. Now you can see the full output inside console in browser

3. So when come to second scenario, the annnonymous function get access to this event 'e' object automatically

4. Then we can pass event as above mention as access fields. eg: target


This will print when click new button. 


"Hello mario <button>​Click With Para​</button>​"


your new coding wil look like


-------------------------------------------------------------


const handleClick = (e) => {

    console.log('Hello World Click',e);

}


const handleClickWithPara = (name,e) => {

    console.log('Hello '+ name, e.target)

}


class Home extends Component {

    render() {

        return (

            <div className='home'>

                <h2>Home Page</h2>

                <button onClick={handleClick}>Click Me</button>

                <button onClick={(e) => handleClickWithPara('mario',e)}>Click With Para</button>

            </div>

        );

    }

}

------------------------------------------------------------------


Wednesday, November 24, 2021

Ninja - React Basic 3 - Add Styles

If you look at root component, you can see the 'App.css' already

Any style add inside App.css will be applied to any page in the browser

if you inspect element in browser, you can see the styles inside <head>


Let's add few styles.

So we gone a add all styles to index.css and remove App.css


new index.css

-------------------


@import url('https://fonts.googleapis.com/css2?family=Quicksand:wght@300;400;500;600;700&display=swap');


/* base styles */

* {

  margin: 0;

  font-family: "Quicksand";

  color: #333;

}

.navbar {

  padding: 20px;

  display: flex;

  align-items: center;

  max-width: 600px;

  margin: 0 auto;

  border-bottom: 1px solid #f2f2f2;

}

.navbar h1 {

  color: #f1356d;

}

.navbar .links {

  margin-left: auto;

}

.navbar a {

  margin-left: 16px;

  text-decoration: none;

  padding: 6px;

}

.navbar a:hover {

  color: #f1356d;

}

.content {

  max-width: 600px;

  margin: 40px auto;

  padding: 20px;

}


-----------------------------


after that let's see add inline style

let's add inline style to navbar.js


class Navbar extends Component {

    render() {

        return (

            <nav className="navbar">

                <h1>Dojo blog</h1>

                <div className="links">

                    <a href="/">Home</a>

                    <a href="/create"

                        style={{

                            color: 'white',

                            backgroundColor: '#f1356d',

                            borderRadius: '8px'

                        }}

                    >New Blog</a>

                </div>

            </nav>

        );

    }

}


Here note: we have two mustache

  • first one for dynamic variable
  • second one for object

style={{color: 'white', backgroundColor: '#f1356d',borderRadius: '8px'}}

Tuesday, November 23, 2021

Ninja - React Basic 2 - Component

Component


Let's have this structure

App.js

Navbar.js

BlogDetails.js

Sidebar.js

Categories.js

Tags.js

To Create  a new component - create new js file, better to have inside folder

create "component" folder inside "src" folder

create "Navbar.js"

src/component/Navbar.js


create code

rcc tab


will generate

------------------------

import React, { Component } from 'react';


class Navbar extends Component {

    render() {

        return (

            <div>            

            </div>

        );

    }

}


export default Navbar;


let's write some code block


class Navbar extends Component {

    render() {

        return (

            <nav className="navbar">

                <h1>Dojo blog</h1>

               <div className="links">

                    <a href="/">Home</a>

                    <a href="/create">New Blog</a>

                </div> 

            </nav>

        );

    }

}


Now let's import and use, inside App.js

once you import, you can nest it inside App.js


import Navbar from './component/Navbar'


add self close Navbar tab just above content

 <Navbar />


Code looks like

-------------


import logo from './logo.svg';

import './App.css';

import Navbar from './component/Navbar'


function App() {

  return (

    <div className="App">

      <Navbar />

      <div className="content">

        <h1>App Component</h1>

      </div>

    </div>

  );

}


export default App;


-------------


Now you can see, Nav bar loaded

http://localhost:3000/


Now let's  create a new component for "Home" page

create home.js file and continue above steps


home.js

rcc tab


------------------------------------------

import React, { Component } from 'react';


class Home extends Component {

    render() {

        return (

            <div> 

            </div>

        );

    }

}


export default Home;


--------------------------------------------


just a add dive tag with className home

add a h2 tag with homepage


import React, { Component } from 'react';


class Home extends Component {

    render() {

        return (

            <div className='home'>

                <h2>Home Page</h2>

            </div>

        );

    }

}


export default Home;


Now you can import in App.js --> 

just remove h1 tag and use <Home />


import logo from './logo.svg';

import './App.css';

import Navbar from './component/Navbar';

import Home from './component/Home';


function App() {

  return (

    <div className="App">

      <Navbar />

      <div className="content">

        <Home />

      </div>

    </div>

  );

}

export default App;

-----------------


Just like that, you can create multiple components , export them and import and use


Ninja - React Basic 1

https://www.youtube.com/watch?v=kVeOpcw4GWY&list=PL4cUxeGkcC9gZD-Tvwfod2gaISzfRiP9d&index=2

npx create-react-app dojo-blog


node_modules   - all dependencies

puic - public files

src -  code you write mostly goes here

App.js

index.js -  kick start app


cd dojo-blog

code 

this will open new project inside VS code


we don't need reportWebVitals();

you can remove all


Loaded App.js --> which import App from './App';   in index.js

What you see in browser inside  --> function App() ...

http://localhost:3000/


npm run start

npm install --legacy-peer-deps


function App() ....

return  --> jsx statement which will be convert to javascript

eg: className will  convert to class


Keep div with App and remove all inside <div className="App"> tag

<div className="App">


<div>


Now you should see a blank page 

http://localhost:3000/


Now add below code snipet inside App div tag


<div className="content">

   <h1>App Component</h1>

</div>


you can see, "App Component" h1 tag displayed in browser

http://localhost:3000/


Note: export default App;

-------------------------

right bottom of App.js

to use, we need to export

eg: we are using this inside index.js

here we import

import App from './App';


then after we use inside render. Rendered to DOM


ReactDOM.render(

  <React.StrictMode>

    <App />

  </React.StrictMode>,

  document.getElementById('root')

);

Wednesday, November 3, 2021

Create Table Basic - react-table (step 1)

 1. create sample app table1

npx create-react-app table1

2. verify the sample app

cd table1

npm start

3. add reat-table

npm install react-table

4. we have install the dependancy, now let's create mock values

https://mockaroo.com/

and create data as needed and save and download. 

Create a new folder inside your app 'component'

new data file 'MOCK_DATA.json'

5. create 'column.js' to add column values

// define labels for wach column
export const COLUMNS = [
    {
        Header: 'Id',
        accessor: 'id'
    },
    {
        Header: 'First Name',
        accessor:'first_name'
    },
    {
        Header: 'Last Name',
        accessor:'last_name'
    },
    {
        Header: 'Date of Birth',
        accessor:'date_of_birth'
    },
    {
        Header: 'Country',
        accessor:'country'
    },
    {
        Header: 'Phone',
        accessor:'phone'
    },
]


6. create 'BasicTable.js' to  make table


import React, { ComponentuseMemo } from 'react';
import {useTablefrom 'react-table';
import MOCK_DATA from './MOCK_DATA.json';
import COLUMNS from './columns';

class BasicTable extends Component {

    const columns = useMemo(() => COLUMNS,[])
    const data = useMemo(() => MOCK_DATA,[])

    // useTable({
    //     // columns: COLUMNS,
    //     // data: MOCK_DATA
    //     // can rewrite as

    //     // columns: columns,
    //     // data: data
    //     // further we can simplify
    //     columns,
    //     data
        
    // })

    // next we create a const to store the useTable
    const tableInstance useTable({
        columns,
        data
    })

    //step6 - render table props
    const {
        getTableProps,
        getTableBodyProps,
        headerGroups,
        rows,
        prepareRow
    } = tableInstance

    render() {
        return (
            // step 4 - define table structure
            // convert div tag to table tag with <thead> and tbody
            // then add <tr> to both thead and tbody to add a row
            // in header use <th> and in body use <td> to add values respectively

            <table>
                <thead>
                    <tr>
                        <th></th>
                    </tr>
                </thead>
                <tbody>
                    <tr>
                        <td></td>
                    </tr>
                </tbody>
            </table>
        );
    }
}

export default BasicTable;

Friday, October 15, 2021

javax.persistence.PersistenceException : (should be mapped with insert="false" update="false")

 Caused by: javax.persistence.PersistenceException: [PersistenceUnit: default] Unable to build Hibernate SessionFactory; nested exception is org.hibernate.MappingException: Repeated column in mapping for entity: com.model.ImprovementInitiative column: investmentQualitative (should be mapped with insert="false" update="false")

Solution

column is repeated.

name of the column is "investmentQualitative "

search that column name in your Model or POJO class "ImprovementInitiative "

remove the repeated or duplicate values

In simple you are trying to create two columns with same name 


Running Spring boot App command line with Maven


mvn spring-boot:run
for gradle
./gradlew bootRun

Wednesday, September 15, 2021

BCryptHash could not be located - MongoDB

 When you try to start mongodb using "mongod.exe" you might get this error relating to 'BCryptHash"

This error comes cause of mongodb version does not support to your windows or OS of the machine. If you are using windows server, check whether it is compatible with your server version

you  can find the compatibility with below link

https://docs.mongodb.com/manual/tutorial/install-mongodb-on-windows/#platform-support


Import certificate to java Key store

 you can use keytool  to install a certificate to keystore. This is needed as eg: when you access a details from Jira site you need to install certificate of jira site to your local java key store.

Let's  say you need to extract details from your Jira production server.

1. save the certificate of the site via browser. you can click the lock sign left with the address bar.


 after that Click Certificate

Go to "Details" tab 

and Click "Copy to File"

let's assume you save the certificate as "jiraProd.cer". Note: cer extension will  automatically given when saving.

2. install certificate use below command

keytool -import -alias jiraProd -keystore "C:\SW\openlogic-openjdk-11\lib\security\cacerts" -file C:\SW\Certs\jiraProd.cer

keytool - tool use to import certicate

alias name given as "jiraProd " . you can verify your certificate after installation by this name

-alias jiraProd   

path to the keysore file

-keystore "C:\SW\openlogic-openjdk-11\lib\security\cacerts"     

 your certificate file or path to certificate file

-file C:\SW\Certs\jiraProd.cer

Install MongoDB in ubuntu

 when you take a specific version of MongoDB, it does not support all the operating systems as a whole.

1. So we need to check the compatibility before.

2. Once find out the correct version suitable for your OS, you can start installing


Below are short steps to install mongo in Ubuntu 18.04 Bionic version.

1. Import the public key used by the package management system.

wget -qO - https://www.mongodb.org/static/pgp/server-5.0.asc | sudo apt-key add -


2. Create a list file for MongoDB

echo "deb [ arch=amd64,arm64 ] https://repo.mongodb.org/apt/ubuntu bionic/mongodb-org/5.0 multiverse" | sudo tee /etc/apt/sources.list.d/mongodb-org-5.0.list

3. Reload local package database

sudo apt-get update

4.Install the MongoDB packages

sudo apt-get install -y mongodb-org

5. Start MongoDB service

 before start service, check whether linux use "systemd" or "init" --> run below

ps --no-headers -o comm 1

to run mongodb

sudo systemctl start mongod

6. Add mondb service to start at restart

sudo systemctl enable mongod


For more info, you can follow

https://docs.mongodb.com/manual/tutorial/install-mongodb-on-ubuntu/

Monday, July 19, 2021

Hibernate - 1

1. Overview of ORM and Hibernate

2. Mappings

  1. Simple
  2. Component
  3. Inheritance 
  4. Collections
  5. Association  

3. Object states in hibernate

4. HQL

5. Criteria


JDBC - Challenges

1. Creating and Closing the connection

2. Dependency - drivers and connection related code depends on the database - whenever DB changes, code needs to be change. For any change, table rename, column added, data type.. for any small change needs application change.

3. Exception handling

4. SQL challenges - for programmer ( programmers tend to low in SQL )

5. Data conversion 


ORM - Object Relational Mapping - In simple Map Object(fields) with Table (columns)

XML based

Annotations 

Hibernate - JPA specification - lies between Java Application and JDBC

Hibernate High Level View


Creating Application

Step 1 : Dependency 

    a. hibernate

     b. JDBC

Step 2: Entity or Persistent - java bean

Step 3: Mapping - contain bean and table ( no configuration on database )

     a.  XML 

      b. Annotations

Step 4: Database (hibernate config)

a. XML

b. properties

c. Programmatic

Step 5: Client - main application 


Step 1 : use spring initializer with adding Spring data JPA,  mysql (driver depends on DB)

Step 2: Create simple Java class and decorate with annotations. @Entity and @ID are important . If you do not use @Table, @Column automatically taken name of class as table name as fields as columns


Step 5: Where should the program start ? reading the configuration for DB. From configurations create Session factory (immutable singleton).Session factory is like a pool of connections.


In Code, lets' assume you have written code to read configuration and created SessionFactory. now execute code. Will tables get created. log will show dropping and creating tables.

No tables will be created. Why ? we have not made a session and create a object and set POJO to session and execute. Then hibernate will create a table, if not ( we are running on UPDATE, not CREATE)

Still new object will not be saved. Why ? 

By default - hibernate auto commit is disable.

Create a Transaction and commit after save(). you can see the INSERT statement. 


Friday, July 2, 2021

Docker Notes -1

 docker-compose down --rmi -all


how do we run two OS in one machine - Using Hypervisor


OS1  | OS2

----------

Hypervisor

-----------

Machine OS


Hypervisor : Virtual Box, VMVare, Hyper-v(only Windows)


Benifit creating Virtual machine

Run application in isolation

same application using different version

eg:

virtual Machine1{App1 with Node14, Mongo 4}

virtual Machine2{App2 with Node9, Mongo 3}


Problems with VMs

-----

Each machine needs full-blown OS (license)

Slow to start ( cause entire OS needs to start just as a normal machine)

Resource intensive ( takes certain Hardware - RAM, cpu ..)


Containers

-----

Allow running multiple apps in isolation(same kind of a isolation)

light weight

Use OS of the host ( share)

Start quickly ( OS already started)

need less hardware resources


so can run more containers compared to vms


docker run client - server architecture

client communicate using RESTApi

server --> docker engine


technically container is a process


basically all containers use kernal of the host
kernal - manages all applications and hardware


Sunday, June 6, 2021

Mongo DB - data file missing error

 Solution :

create data file --> C:\\data\\db\\


Below is the complete error log

--------------------------------


C:\SW\mongodb-win32-x86_64-windows-4.4.4\bin>mongod.exe

{"t":{"$date":"2021-06-07T08:32:24.699+05:30"},"s":"I",  "c":"CONTROL",  "id":23285,   "ctx":"main","msg":"Automatically disabling TLS 1.0, to force-enable TLS 1.0 specify --sslDisabledProtocols 'none'"}

{"t":{"$date":"2021-06-07T08:32:25.211+05:30"},"s":"W",  "c":"ASIO",     "id":22601,   "ctx":"main","msg":"No TransportLayer configured during NetworkInterface startup"}

{"t":{"$date":"2021-06-07T08:32:25.212+05:30"},"s":"I",  "c":"NETWORK",  "id":4648602, "ctx":"main","msg":"Implicit TCP FastOpen in use."}

{"t":{"$date":"2021-06-07T08:32:25.214+05:30"},"s":"I",  "c":"STORAGE",  "id":4615611, "ctx":"initandlisten","msg":"MongoDB starting","attr":{"pid":9236,"port":27017,"dbPath":"C:/data/db/","architecture":"64-bit","host":"COMPUTER"}}

{"t":{"$date":"2021-06-07T08:32:25.214+05:30"},"s":"I",  "c":"CONTROL",  "id":23398,   "ctx":"initandlisten","msg":"Target operating system minimum version","attr":{"targetMinOS":"Windows 7/Windows Server 2008 R2"}}

{"t":{"$date":"2021-06-07T08:32:25.214+05:30"},"s":"I",  "c":"CONTROL",  "id":23403,   "ctx":"initandlisten","msg":"Build Info","attr":{"buildInfo":{"version":"4.4.4","gitVersion":"8db30a63db1a9d84bdcad0c83369623f708e0397","modules":[],"allocator":"tcmalloc","environment":{"distmod":"windows","distarch":"x86_64","target_arch":"x86_64"}}}}

{"t":{"$date":"2021-06-07T08:32:25.215+05:30"},"s":"I",  "c":"CONTROL",  "id":51765,   "ctx":"initandlisten","msg":"Operating System","attr":{"os":{"name":"Microsoft Windows 10","version":"10.0 (build 19042)"}}}

{"t":{"$date":"2021-06-07T08:32:25.215+05:30"},"s":"I",  "c":"CONTROL",  "id":21951,   "ctx":"initandlisten","msg":"Options set by command line","attr":{"options":{}}}

{"t":{"$date":"2021-06-07T08:32:25.216+05:30"},"s":"E",  "c":"STORAGE",  "id":20557,   "ctx":"initandlisten","msg":"DBException in initAndListen, terminating","attr":{"error":"NonExistentPath: Data directory C:\\data\\db\\ not found. Create the missing directory or specify another path using (1) the --dbpath command line option, or (2) by adding the 'storage.dbPath' option in the configuration file."}}

{"t":{"$date":"2021-06-07T08:32:25.216+05:30"},"s":"I",  "c":"REPL",     "id":4784900, "ctx":"initandlisten","msg":"Stepping down the ReplicationCoordinator for shutdown","attr":{"waitTimeMillis":10000}}

{"t":{"$date":"2021-06-07T08:32:25.216+05:30"},"s":"I",  "c":"COMMAND",  "id":4784901, "ctx":"initandlisten","msg":"Shutting down the MirrorMaestro"}

{"t":{"$date":"2021-06-07T08:32:25.217+05:30"},"s":"I",  "c":"SHARDING", "id":4784902, "ctx":"initandlisten","msg":"Shutting down the WaitForMajorityService"}

{"t":{"$date":"2021-06-07T08:32:25.217+05:30"},"s":"I",  "c":"NETWORK",  "id":20562,   "ctx":"initandlisten","msg":"Shutdown: going to close listening sockets"}

{"t":{"$date":"2021-06-07T08:32:25.217+05:30"},"s":"I",  "c":"NETWORK",  "id":4784905, "ctx":"initandlisten","msg":"Shutting down the global connection pool"}

{"t":{"$date":"2021-06-07T08:32:25.217+05:30"},"s":"I",  "c":"STORAGE",  "id":4784906, "ctx":"initandlisten","msg":"Shutting down the FlowControlTicketholder"}

{"t":{"$date":"2021-06-07T08:32:25.218+05:30"},"s":"I",  "c":"-",        "id":20520,   "ctx":"initandlisten","msg":"Stopping further Flow Control ticket acquisitions."}

{"t":{"$date":"2021-06-07T08:32:25.219+05:30"},"s":"I",  "c":"NETWORK",  "id":4784918, "ctx":"initandlisten","msg":"Shutting down the ReplicaSetMonitor"}

{"t":{"$date":"2021-06-07T08:32:25.219+05:30"},"s":"I",  "c":"SHARDING", "id":4784921, "ctx":"initandlisten","msg":"Shutting down the MigrationUtilExecutor"}

{"t":{"$date":"2021-06-07T08:32:25.220+05:30"},"s":"I",  "c":"CONTROL",  "id":4784925, "ctx":"initandlisten","msg":"Shutting down free monitoring"}

{"t":{"$date":"2021-06-07T08:32:25.220+05:30"},"s":"I",  "c":"STORAGE",  "id":4784927, "ctx":"initandlisten","msg":"Shutting down the HealthLog"}

{"t":{"$date":"2021-06-07T08:32:25.221+05:30"},"s":"I",  "c":"STORAGE",  "id":4784929, "ctx":"initandlisten","msg":"Acquiring the global lock for shutdown"}

{"t":{"$date":"2021-06-07T08:32:25.227+05:30"},"s":"I",  "c":"-",        "id":4784931, "ctx":"initandlisten","msg":"Dropping the scope cache for shutdown"}

{"t":{"$date":"2021-06-07T08:32:25.227+05:30"},"s":"I",  "c":"FTDC",     "id":4784926, "ctx":"initandlisten","msg":"Shutting down full-time data capture"}

{"t":{"$date":"2021-06-07T08:32:25.229+05:30"},"s":"I",  "c":"CONTROL",  "id":20565,   "ctx":"initandlisten","msg":"Now exiting"}

{"t":{"$date":"2021-06-07T08:32:25.230+05:30"},"s":"I",  "c":"CONTROL",  "id":23138,   "ctx":"initandlisten","msg":"Shutting down","attr":{"exitCode":100}}


Wednesday, June 2, 2021

Cloud certification links


1. AWS Solutions Architect - Assoc (https://aws.amazon.com/certification/certified-solutions-architect-associate/)

 2. AWS Developer - Assoc (https://aws.amazon.com/certification/certified-developer-associate/

3. AWS SysOps Admin - Assoc (https://aws.amazon.com/certification/certified-sysops-admin-associate/

4. AWS Solutions Architect - Prof (https://aws.amazon.com/certification/certified-solutions-architect-professional/

5. AWS DevOps Engineer - Prof (https://aws.amazon.com/certification/certified-devops-engineer-professional/

6. AWS Big Data - Spec (https://aws.amazon.com/certification/certified-big-data-specialty/

7. GCP Assoc Cloud Engineer (https://cloud.google.com/certification/cloud-engineer

8. GCP Prof Cloud Architect (https://cloud.google.com/certification/cloud-architect

9. GCP Prof Data Engineer (https://cloud.google.com/certification/data-engineer

10. Azure Admin Assoc AZ-103 (https://www.microsoft.com/en-us/learning/azure-administrator.aspx

11. Azure Developer Assoc AZ-203 (https://www.microsoft.com/en-us/learning/azure-developer.aspx)

Negotiations

 When you first met

Preamble - Discussion happens before negotiation

1. Do not open at start


Create a bat file to set path

 you may have to set path manually so many times due to various reasons. In a scenario like that best thing is to make a bat file and set path at once. below is simple sample bat file for that.

1. create notepad and save with content to PATH variable as below and save as "path.bat", file name can be any name as per requirement.

SET PATH=C:\Program Files\Java\jdk-12.0.1\bin;C:\Project\New2019-07-22\sw\apache\apache-maven-3.5.4\bin;


Micro services old note


What is Micro Service?

Architecture style to build Autonomous, independently deployable services collaborate together to form an application.

You must have worked on and may be created applications without calling micro services.

How small it should be – depends

Why do we need micro service ?

Monolith – software typically all application is in a Single Codebase.

              Single Codebase – exist in a source repository where all developers collaborate each other.

Typically build artefact runs in a

              Single Process – build the artefact

              Single host -  runs on a single host.

              Single Database – persist to

              Consistent Technology – dev env, single programming language, sdk used

Benefits of Monolith

              Simplicity

              One codebase – easy to find

              Deployment – one application to replace

Nothing wrong. Then Why we need micro services? or You don’t Micro services, Yet


Problem of scale

              Many developers , many users, many data, code base grow- difficulty in maintain ( growing complexity and accumulation of technical debt) , entangled modules ( wired here and there, although u put an effort and build a modularised app)


Deployment – single line of change need to deploy the whole app

              Risky

              Usually requires a significant downtime

                             But some use modern level cloud services

Difficult to Scale – unless you make it stateless

              Horizontal scaling often not possible

              More possibility towards vertical scaling

                             Too expensive , add more hardware(memory, hard disk , processor etc)

              Whole application must be scaled

              Finally - Wedded to Legacy technology

                             Have to upgrade entire application to move to a newer frame work

                             Reduces agility – ability introduce new practices, take advantage of innovation


Distributed monoliths

You can argue my app is not a monolith. It has few services, just like CMP


SOA – service oriented architecture

System built as services, but

              Uses a single database

              Tightly coupled

              Everything must be deployed together (or few together)

              New features require, changes every where


This where you need to understand what micro services else you will end up building something worse than monolith or distributed monolith (SOA)


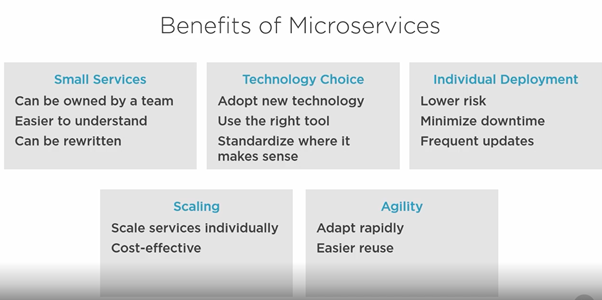
How are micro services better than Monoliths?

Small services

Can be owned by a team

Easier to understand

Size – small enough to be thrown away and rewrite

Technology Choice

              Adopt new technologies -  without upgrading whole application as Monolith

              Use the right tool – for specific task

                             One might use relational database where other document database

                             Object oriented programming language , other functional programming language

              Standardize where it makes sense – but no hard rules, common agreement like in REST

Individual deployment – cause of loose coupling

              Lower risk – no need to upgrade, deploy entire system in one go

              Minimize down time – zero downtime

              Frequent updates

Scaling

              Scale services individually

              Cost effective – compared to monolith

Agility

              Adapt rapidly – for changing business requirements

              Easier re use


Downsides – New Challenges – Not a free lunch -  whether micro services a good solution for you

Challenges

Developer Productivity

How can we make it easy for developers to be productive working on the system?

Do they have to download code for every single micro service?, run individually, configured them to talk to each other, That can be error prone and time consuming , way of easily working on a single micro service and as well as testing in the context of whole application

Complex Interactions

Take car to avoid inefficient, chatty communications between micro services

IF we brake application for dozens of micro services then interactions may be complicated.

Deployment

You will need to automate the process – you will have lots of micro services

Monitoring

We need to have a centralized place to check the logs and monitor  for problems – cause you cannot go to each service and find logs


These are just a few

So lots of challenges – good news- you have lots of patterns and technologies to help you to overcome these challenges


Micro services – Do not dictate on

              What technology

              What type of data base you use

              What type of communication – asynchronously or synchronously

              What authentication mechanism

Completely free to use your favourite| best programming language, tools


Micro services Architecture(wrap up)

-          Comparisons with monoliths

-          Benefits

-          Challenges


--

Build a new app using Micro services architecture or to migrate monolith to microservices

Need to make Important Architecture decisions upfront

You do not have start with a micro service, but possible to evolve existing app step by step

Evolving towards micro services

-          Micro services are autonomous – which means own its own data

-          Own their data

-          Independently deployable – clearly defined and backward compatible public interfaces

-          Identifying micro service boundaries – very tricky, breaking monolith, boundary to context

-           

What if I have a monolith already?

-          Augment a monolith

o   Add new micro services

-          Decompose a monolith

o   Extract micro services

-          No need to start with a micro service

o   Hard to get the service boundaries at start

o   Benefits are not seen in small projects

o   Let the app grow a little and then segregate for micro services

Micro service Own data

Avoid sharing a data store – data store per service

Limitations

-          Data base joins – in two different databases

-          Transactions – cannot update two tables in two dbs,

o   Either use distributed transactions – very complicated or design our application to work in a ENETUALLY CONSISTANT manner

-          Eventual Consistency

o   May have to wait a while for overall state of the data to be fully consistent. What this means in practise, when a single business process requires to update more than one data source, there will be a small window of time when changes made in one data store, but not the other. So you need to design your applications in a such a way that it handle this Temporary Inconsistency.

o    


Summary

Evolving towards Micro service

Micro service own their data

May consist of multiple processes

Should be independently deployable

Avoid breaking changes – changing APIs

Identify “Bounded Context”  for micro service boundaries

Getting boundaries right – critical factor


Micro  Service Hosting Options

-          Virtual Machines

              VM per service – can be little costly , cause there are so many

              Few services in one VM – but can be messy as each MicroService has  its own requirements, frameworks, database, performance etc.( you can imagine with running few monoliths one machine)

-          Operational challenges

-          Service Discovery

Platform as a Service

Automatic Scale out

DNS address

Load balancing

Security

Monitoring

Serverless – nano services

Containers package up applications

Portable – run any where

Easily run locally

Docker compose


Use cloud – Paas – then you need invest more, cause as micro services grow – productivity of the developers drop

 Creating New MicroService

-          Source control  repository per micro service

o   Avoid tight coupling between services

-          Continuous Integration build

o   Run automated tests

Types of Tests

-          Unit Tests -fast to run, high code coverage

-          Service level test – Integration test, Test single service in isolation, Mock collaborators, Invest for Framework creating service level test

-          End to End Test – Production like env, Can be fragile,

Micro Services templates

Standardize

Logging – all logs in a same format

Health Checks –

Configuration –

Authentication

Build  scripts – use containers, docker


Increase Productivity

Developers focus on implementation of Business logic rather than plumbing infrastructure


Connected shared services – cloud services


Communicating between MicroServices

Asynchronous and Synchronous communication patterns


Calling MicroServices

Are there any rules, can any service can call each other

Web, Mobile etc allowed call MS directly.

There are no hard rules, but there are difficulties when allowing free flow access and call

-          End up making Tangled dependencies

-          Making cascading failures – one MS fail, causes to fail  others as well

-          Poor performance – call to one MS ends up with calling dozens of MS call call hops

-          Mispalce (service) boundaries


Better

-          Minimize call between MS – you can publish through event BUS, subscribe to services via BUS

-          Promote Asynchronous call between MS

-          Front end app, Single page app, Mobile – without coming directly use a pattern call API Gateway – will have several benifits

o   Authentication – API Gateway level, security can handle from single point

o   Front end apps needs to know how to call different MS

o   Decouple Front end apps with MS , backend APIs

o    


Micro Services do not call each other, Instead create events in Event Bus


Event Bus implemented in either RabbitMQ when we run locally or Azure Service Bus when running cloud

Messages are subscribed by MS and handled Asynchronously.

So use different communication patterns, suitably as shown.


API gateway for Each level


Synchronise Communication

Eg: Retrieve information from DB, select query

This is an Asynchronous call – customers do not want to wait.


HTTP

-          Industry Standard

-          Can take advantage

o   Standardize approach

o   Caching – standard error codes

o   Payloads -JSON {native format of javascript, support by many, easy}, XML

o    


-          Implement APIs as a set of resources (RESTful APIS)

o   Eg: Catalog Item, Order {Information as resources}

-          Use standard HTTP methods

o   GET to retrieve, PUT

-          Good use of HTTP status Codes

-          Media Type headers (Content Type)


Rest is a big Topic. This is just a little


Asynchronous Communication

When we cannot  expect user to wait until everything is finished.

Communication over HTTP

Send status code “Accepted” rather than “OK” – then user can check the status later

Callback – MS itself reports back when task is complete. Client can register for callback URL , on which they like to receive notification


Via Messaging

With registering to even BUS, others subscribe (rather than calling directly)

1.       Simply creates a message and sends to “Message Broker” – which acts as Intermediator.

2.       Other MSs subscribe to those messages

Act as an Intermediator , decouples micro services completely.

Advantage for scaling – eg:If unprocessed messages growing, you can simply scale out that MS with multiple instances.

Many “ServerLess” platforms does this automatically.

With containers also possible with configuring cluster of services| containers


Message Types

-          Commands

-          Events

Command is an request to performed on particular action eg: send a email

Events – something has happened, In Past Tense, several actions might need to occur as result of that event eg: OrderPlaced ( charging credit card, sending confirmation mail, checking on stock levels..)


RabbitMQ, Azure Service BUS

https://www.enterpriseintegrationpatterns.com/

Resilient Communication Patterns

We cannot expect service to be run 100% without error and failure

Implement retry with backoff

              First attempt fail, wait little while – If second fail wait for more … back off

              IF too many attempts made – their can be denial of service attacks

Circuit breaker

              Sit between client and server

              Passes call through (circuit breaker is “closed”)

              If enough errors are detected, blocks further calls (circuit breaker is open)

              After time out – allows some calls to through, to see the problem has been resolved.

                            If OK – circuit close else open

              Simple , but powerful – many have implemented – just use


Caching

Fallback to cache data, if service is unavailable


Messaging resilience ( Message Broker)

Inherent support for resilience


Idempotent

              If calling twice with same message will have same effect as call in once.

Eg: In e commerce sample app – we should have good check to make sure for a order process multiple times – make sure ship once, charge once for credit card

3.       You receive a message and partly processed and something happens. As a result you receive it again.


Service Discovery

To  MS to communicate with each other – each should have an address

How to find and keep track

Service registry

When you need to communicate to MS, ask service registry – where is that MS

Service Registry – typically distributed among all the machines in the cluster. Which makes easy to contact service registry.


Service Discovery – Alternatives

DNS

If you using cloud – you automatically get DNS and plus load balancing

If use Container such as Kubernetes

              Built in DNS – no need to know the IP address of each container , just need to know the name of the service you need to call MS. It willtake care of routing traffic to container you are running the service. Load balancing, if necessary.


So to handle challenges are much more easier – if you host MS in modern platform


Securing Micro Services


You may use HTTPS – (TLS – Transport Layer with certificates issues by trusted party), but it does not mean secure. You need to Authenticate the user.

Authentication Option

-          Basic Authentication – User name and pass

Problem is every MS need to securely store passwords – need best practises, better hashing etc

-          API key – (key per client , key management)

-          Client certificate (public key cryptography- prove caller identity, but quite difficult to keep install and manage)


Is there a better way, one of the most promising approaches – Identity server

Authorization server – takes care of the complexity of authentication and authorization

1.       Client Authenticate with identity server by sending credentials

2.       Identity server returns an access token (which got limited life time)

3.       Access token in authorization header – to MS (these are signed by public key cruptography helping the to verify )

4.       Verify Access token with Identity server

Here One service has the job of

              Authentication users and Managing their credentials securely.

              Cause IS implemented using Industry standard (OAuth 2.0 & OpenID connect) you don’t have to write. You can make use of a third party solution. Writing IS is a lot of work.